Friday, November 5, 2021

This month I am reviewing items that will be perfect for capturing the essence of autumn color, which is a nice departure from October’s monochromatic Inktober series. Spooky and moody transitions to the brilliant and cozy shades of nature. This week I am going to review a few products that I have not used before: Windsor & Newton watercolor Promarkers, the Art-n-Fly Premium watercolor pad, and Canson’s Artist Series Mix Media pad. 

Affiliate Disclaimer: For full transparency, you should know that many of my links in my posts are affiliate links. As an Amazon affiliate, I receive a small commission when readers purchase items using my affiliate links. This helps me fund the blog domain costs, and you will not be charged extra if you buy anything using my links.
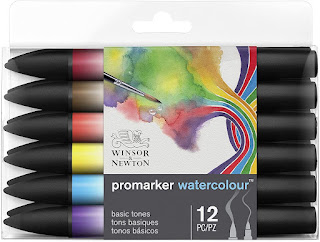
Image of Windsor & Newton set of Basic watercolor Promarkers from Anazon.com
W&N Promarker Basic tones set
(image from Amazon.com)


 Windsor and Newton Watercolor Markers 

I bought two sets of the Windsor & Newton watercolor markers and two individual shades earlier this year. I have used them more for coloring books than to make artworks with them. I have loved using them in my better coloring books because they do not bleed through the paper as easily as alcohol markers do. Here are the sets and single markers I have bought:

Landscape Set of 6 Amazon link: https://amzn.to/3w3mJ2I

Basic Tones Set of 12 Amazon link: https://amzn.to/3w7vp8r

Gamboge Hue individual Amazon link: https://amzn.to/3w6fEyy

Pale Rose individual Amazon link: https://amzn.to/3mxUd69

Compared to typical brush pens with water-based ink, these markers put down more pigment, which can take a lot more water than the more translucent brush pens. I have been able to make washes by “drawing” in the wells of my porcelain paint pallet and adding water, but this is a very wasteful endeavor if you are washing a large area. In my opinion, the W &N watercolor markers are best used for travel and plein air painting with small works of art. They give you the control of a marker and work well with your water brushes (I mean the refillable ones with water wells, not brush markers).

While these markers have excellent pigments and high-quality nibs, they are pricey. That comes with the Windsor & Newton name. That said, I have layered these with traditional watercolor and gouache paints, watercolor and InkTense pencils, brush markers, and dry media with very few problems. The colors mix well with one another, so you can get away with a basic color set at first and save some money. The markers are double ended with a finer bullet tip for details and a solid but flexible brush- like tip that can cover larger areas with some pressure. While the watercolor Promarkers look a lot like alcohol markers, they do not fill solid areas without streaking. You can create some lovely textures with them, but do not expect to get solid cartoon cell type of coloring out of them.  

Image of Art-n-Fly Premium watercolor pad from Amazon.com
Art-n-Fly Premium Watercolor Pad
(image from Amazon.com)


Art-n-Fly Premium Watercolor Pad 

 I have talked about the difference between cotton rag and pulp watercolor papers in a past post where I went into some detail, and I recommend reading that older post if you are interested. I was interested in this Art-n-Fly Premium Watercolor Pad because it is 100% cotton paper, which is hardier than pulp and can accept more wet washes and surface scrubbing. This watercolor pad contains 15 sheets of cold-press acid-free 140 lb. paper that is glued on two sides to ensure your work stays flat while you are painting and dries flat for presentation. The back is a heavy cardboard that provides adequate support for painting on the go, and the fold-over front can be tucked neatly behind the pad to stay out of your way while working. The 9 x 12-inch size was only about $17, which is much more affordable than Arches and Windsor & Newton watercolor blocks of the same size and weight.

I tried the W & N markers on it, and I should warn you that this paper will suck the life out of them if you draw directly onto the dry paper. I doubt that is the suggested way to use the markers, but I wanted to try it out to see what happened. The paper takes traditional watercolor washes rather well, and you can “erase” areas with extra water without destroying the surface.   
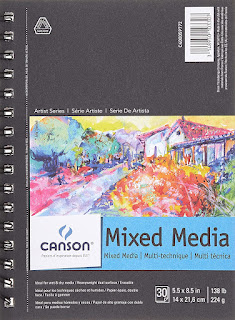
image of the Canson Artist Series Mix Media pad from Amazon. com
Canson Artist Series Mixed Media pad
(image from Amazon.com)


Canson Artists’ Mixed Media Pad 

I have posted about the Canson XL mixed media pads previously because I have used so many of them over the years, but Canson also makes a higher quality Artist Series Mix Media pad that I decided to test out for comparison. First and foremost, this pad has heavier paper (148 lb. versus the 98 lb. XL paper) so it can endure a little more surface scrubbing and water. The acid-free paper offers two surfaces: a medium tooth front and finer back side. This means you can layer more dry media and apply more water with your wet media, but you still have the smoother surface on the reverse side that will work better for pen and ink and marker. I bought the 8.5 X 5.5-inch size wire-bound pad to try out, but there are other sizes available, including a hardback version that is great for preserving finished works.

This pad is not glue bound, so there is a bit of warping with water techniques, but the paper flattens nicely after it is dry. I would normally use a bit of painter’s tape along the free edge to keep the page flat as it dries, but I experimented with leaving it free, and there was no permanent warping. While this is a pulp paper, you don’t get those dreaded dingleberries as easily from the surface when you rework areas. I think I am going to buy the Artist series from now on, after I use up the XL pads I currently own.

I will keep playing with my watercolors on the new papers and give updates, but I love what I see so far. What are your favorite color media for autumnal art? I look forward to your replies!

Friday, October 22, 2021


Affiliate Disclaimer: For full transparency, you should know that many of my links in my posts are affiliate links. As an Amazon affiliate, I receive a small commission when readers purchase items using my affiliate links. This helps me fund the blog domain costs, and you will not be charged extra if you buy anything using my links.

Papers for Ink Drawing 

I was planning to make a post for paper and inks together this week, but I assume most people are not interested in reading an Iliad length post, so I will concentrate on paper this week and do inks next week. This way I can touch on all the major aspects of pen and ink drawing before we run out of October.

 I love paper, maybe too much, but that is a love story for another time. Let’s talk about paper for ink drawing. You will get the best results with pen and ink using a smooth paper in a medium to heavy weight like cardstock or Bristol Board. However, if you are making daily drawings for Inktober, you might want a bound book to keep all 31 drawings and your sketches together for the year. In 2019 I used an 8 x 8 Illo Sketchbook, which I have already reviewed it in an earlier post. I have tried out other brands since then, and if the Illo is not available for you, there are plenty of alternatives now.


Image of the Ohuhu marker pad from Amazon.com
Ohuhu Marker Pad
(Image from Amazon.com)

Ohuhu Square Marker Pad 

The Ohuhu square marker pad comes in various sizes, but I have the 8.3” square version. It contains 78 sheets (156 pages) of 120 lb smooth paper. While it is meant for alcohol markers, it is also suitable for ink drawing. The tight surface allows your pen to glide without catching on any texture. I had no issues with bleeding, but I didn’t use heavy washes. This isn’t the kind of paper that will hold a lot of water since it is made for illustration markers with fast drying alcohol inks.


The size is perfect for daily ink drawings, and the perforated pages will stay in place until you decide to remove them. Just like with the Illo, the Ohuhu pad has a hard binding with a ribbon place holder and an attached elastic band. It also lays perfectly flat and features a back pocket just like the Illo. One thing that this book includes that the Illo doesn’t is a square plastic protective mat that prevents bleed through and indentations on the unused pages. The mat is the exact size of the page, so you can keep it tucked in the book when not in use. The price is comparable to the Illo at around $17, but the Ohuhu book has more pages. You can also save a little bit by using Amazon’s Subscribe & Save, which is not available for the Illo book at this time.


Image of Paul Rubens hot press watercolor book from Amazon.com
Paul Rubens Hot Press watercolor book
(image from Amazon.com)

Paul Rubens Hot Press Watercolor Pad 

I bought the teeniest size of this watercolor book because I had never used the brand before, and I want to do miniature artworks with it. This book is a whopping 3.8 x 5.2 inches in size, and it contains 20 sheets of 140 lb, acid-free, 100% cotton, hot press watercolor paper. Hot press is better for ink drawing because it has a smoother surface than the cold press or rough varieties, but it still has a slight tooth.

 While the stout paper will hold a wash, adding water will likely cause some feathering and spreading on tight lines. I used both technical and dip pens with no additional water on this paper, however, and the ink lines stayed crisp and fine. Even though it is a small book, it still lays flat and has a back pocket and a stabilizing elastic band just like the Illo and Ohuhu books. The Paul Rubens 3.8 x 5.2 book is only ten bucks, while the 7.6 x 5.3 size is $15, and both sizes come with a choice of black or pink cover. Again, this is high quality cotton rag paper, not a sketchbook.

Canson XL Mixed Media Pad
(image from Amazon.com)
Canson XL Mixed Media Pad 

I know I have discussed this paper in other posts, but I figured I would discuss the Canson XL Mixed Media pad for ink drawing as well. I have bought several of these pads in pretty much every size available. The 98 lb moderately smooth, acid-free surface is very amenable to both technical and dip pens. I have used it for pen, pencil, colored pencil, brush pens, watercolor and Inktense pencils, watercolor and gouache paints, and alcohol and watercolor markers. The paper handled everything I threw at it except for heavy washes and wet layers. The surface does not have the tooth for heavy dry layering, either. This is an affordable line that is widely available. I have bought most of my pads from my local Walmart.   

While looking for the Amazon listing for the Canson mixed media papers, I discovered that there is now a “rough” version of this paper that is heavier (114 lb) with a toothier surface. I will be buying a pad and reviewing this version in a later post for sure!   

Inktober Sketchbook Part II 

Even though I already reviewed the Inktober sketchbook by Eye Sooksabai in my October 8 post, I want to give it a mention here too. I have been using it primarily to sketch ideas and write notes for each prompt, but I also used some technical pens on some pages with no problems. It’s cute and functional, and there is more than enough room for sketches and finished drawings. If you don’t use ink washes or heavy layering, the paper will hold up just fine. I use a scrap piece of heavier card to place between my working page and the rest of the book to avoid leaving indents or bleeding on the clean pages.

Since I mentioned this for the other books, I will add that this is a paperback cover that does not lay flat. Now keep in mind that this $9 book is not from a major brand but an indie artist/publisher, so it wouldn’t be fair to compare it to any of the products above.

Image of Inktober sketchbook with collection of pens and paper
The Inktober Sketchbook by Eye Sooksabai


Again, my next post for the last Friday in October will dedicated to ink. Let me know if you have a favorite paper for pen and ink drawings, and feel free to share any Inktober related information in the comments. Have a great weekend!

Update 1 November: I had some technical issues for the past few days, so I wasn't able to post the ink blog as planned. Since we are already in November, I feel like it is best to move on to another series. Most people will be ready for some color now, so I look forward to posting about some of my new painting supplies. 


Friday, October 15, 2021

My favorite Dip Pens and Nibs


Affiliate Disclaimer: For full transparency, you should know that many of my links in my posts are affiliate links. As an Amazon affiliate, I receive a small commission when readers purchase items using my affiliate links. This helps me fund the blog domain costs, and you will not be charged extra if you buy anything using my links. 

In my previous post I think I inadvertently and unfairly blamed the Inktober 2021 prompts for my lackluster performance. That’s pretty lame because the inspiration and resulting artwork must come from my own creativity, regardless of how much a prompt resonates with me. After spending my spring and summer doing interior design and home improvement projects, I have jumped into Inktober cold, not having so much as sketched over the last several months. Additionally, while I love pen and ink, my experience with it is inconsistent. I have had ink go bad before I even use half the bottle (it stinks when it goes bad, FYI). So for this week’s post I will go over some basics that I am revisiting, and my reviews will center on the components of dip pens: holders and nibs.

A Tip from a Serial Offender:

One thing about dip pens that I always underestimate is their sharpness. Unlike most calligraphy nibs with square tips, the steel tips on drawing nibs are almost needle sharp. For this reason, you don’t want to use wimpy paper as these nibs will scratch right through the surface sizing. The result is annoying paper fiber dingleberries over which the Ink tends to feather and bleed. This can also happen if you use too much pressure while drawing on heavier paper, so don’t be too heavy handed with your dip pens. It’s a tragic event that could put one off pen and ink completely, and we can’t have that, can we? 

Pen (Nib) Holders 

Currently I am using Japanese comic nib holders by Tachikawa, but choosing a holder is personal. Most artists have their favorite pens and pencils that they reach for more than others. Often the weight and shape of a utensil is what makes it most comfortable in the hand, and a nib holder is no different. I own classic Speedball nib holders that are probably at least 10 years old. These are the easiest to find in the U.S, and they cost very little. I switched to the Tachikawa T40  and TP-40 holders because the larger barrel is more comfortable for me. The Tachikawa T-40 has a wood handle, while the TP-40 is plastic, but they are otherwise the same model, and they come with caps to protect your nibs. They have soft rubber grips and fit a wide variety of nibs including the small crow quill nib which has a cylindrical base and is known as a mapping nib among manga artists. There are also holders that only accommodate these nibs, such as the Speedball Hunt Crow Quill Point Holder. Again, this is a cheap alternative but it’s tiny, and I find it messy to remove dirty nibs from the little guy.


Image of Speedball/Hunt pen holder from Amazon.com
 Speedball/Hunt crow quill pen
holder(image from Amazon.com)


Image of Tachikawa T40 pen holder with G and mapping nibs from Amazon.com
Tachikawa T40 pen holder shown
with the Zebra G and Maru nibs 
(image from Amazon.com)


Nibs, Glorious Nibs! 

There are so many nibs available for drawing and calligraphy that I cannot begin to review a fraction of them. My knowledge is also limited, so I recommend the JetPens blog for learning about every type of pen point. I am not affiliated with the store, but I have had positive experiences when I bought inking supplies from them, and I have learned a lot from the blog.

 I am not a manga artist, but the comic nibs made for manga are some of my favorites. They are popular among artists because they have firm, pointed tips and low to medium flexibility. This limited flexibility allows for clean, consistent lines, which is a bonus if you have shaky hands. Manga nibs are also elastic, meaning that they spring back into shape immediately after each stroke, which is also beneficial for steady lines. Like flexibility, elasticity also varies by nib. You need to play with different types to find which ones are best suited to your drawing style, but as a rule, beginners tend to do better with nibs that are low in flexibility and elasticity as they are easier to control. Manga nibs are also known for their stable line width. Width changes as you apply more pressure to the nib (remember, though, the dingleberries!), but you can get reliable widths if you use consistent pressure.

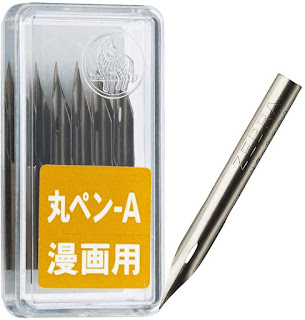
The most common nibs used by comic artists are the G, Spoon (Naji/Tama), School, and Mapping (Maru) nibs, but these types can vary between brands. Some are harder (less flexible) than others. I bought Zebra G and Spoon (Tama), and Deleter Maru nibs. Of all these, the G pen is the most flexible and produces a wide variety of line widths, but it may be hard to control if you are new to pen and ink drawing. Spoon nibs produce the most consistent lines and are beginner-friendly, but they are not suited for varied line expression. They are best for scenery and inanimate objects. School pens are smaller than G or Spoon types and fall between the two in flexibility. They are recommended for beginners who are not quite ready for G pens. The mapping (Maru) nib makes the finest lines of all three, perfect for details such as eyebrows or lashes. It resembles the Hunt crow quill tips mentioned above, so be sure to check your holder to make sure it will accommodate the tiny nib.


Image of box of maru nibs from Amazon.com
Zebra Maru (mapping) nib
(image from Amazon.com)


There are western brands such as Speedball, Hunt and Brause that make similar shaped nibs, but these do not necessarily create the same types of lines and they may not fit a Japanese pen holder. For example, the Speedball/Hunt 512 Bowl pen was the first nib I used (decades ago) in high school art class. It has the same basic shape as the Japanese (Nihonji) and Spoon nibs, but the tips are different on all three pens. The 512 is also smaller than the Japanese nibs, but you can’t tell if you are looking at closeup photos on product listings. The size difference is noticeable when you see the nibs side by side (I am including a photo of my 512 and spoon nibs). One is not necessarily better than the other, but I notice a distinct difference in flexibility when I use them.


Image of two different nibs with the Speedball 512 on the left and the Zebra spoon nib on lef
Hunt/Speedball 512 nib (left), Zebra spoon nib (right)


Next Friday I will talk about inks and papers that I have tried over the years. What is your favorite pen and nib combo? Do you think there is a difference between Japanese and western brands, and which do you prefer? I would love to hear your feedback!


Friday, October 8, 2021

Inktober Week 1: Cue Womp-Womp.wav


Affiliate Disclaimer: For full transparency, you should know that many of my links in my posts are affiliate links. As an Amazon affiliate, I receive a small commission when readers purchase items using my affiliate links. This helps me fund the blog domain costs, and you will not be charged extra if you buy anything using my links.

I am sad to admit that I haven’t been particularly inspired by the prompts so far. I wanted to provide an ink drawing for each day, but nothing I have finished this week is worth sharing, to be honest. I have decided that I will post my reviews each Friday for the products I have used while attempting the prompts for the week. This week I used the Inktober sketch book, a variety of technical pens from Micron, Prismacolor, and Kuretake Zig Mangaka, and the Fude Pen #55 that came with the Kuretake Zig Illustration set

Image of the Inktober sketchbook with other sketchbooks and multiple pens
My copy of the Inktober Sketchbook by Eye Sooksaai

Inktober Sketchbook

The Inktober Sketchbook by Eye Sooksabai is an inexpensive and fun way to organize your daily Inktober sketches and drawings. I bought the 8.5 x 11 size, but there is a smaller one available. The book can be used for any year as each of the 31 pages has a block at the top labelled “concept” where you can add in the idea prompt and date. At the bottom of each page is a tiny ink drawing of an empty ink bottle and a drop of ink. I decided to put the dates in the little jars. 


Image of front cover of Inktober sketchbook from Amazon.com
Image credit: Amazon.com
Amazon information is sparing on this product, but I figured it would be worth $8.99, and I was right. I compared the white paper to my other papers on hand, and I feel like it is in the 60lb range. That is standard sketchbook paper, so you won’t want to use washes or layers of marker on it. I think it is perfect for pencil sketches and light use of ink with technical pens, but it is too delicate for the sharp steel comic nibs I use with my dip pens. I can’t determine if the paper is archival or acid free, and I wish the product category would include that information. Bottom line: it’s a cute “gimmick” that you can keep your sketches in for the Inktober season. 


Prismacolor and Micron Technical Ink Pens

I used Prismacolor Premier extremely fine line markers in the .005, .03, and .05 widths and Micron Pigma liners in .03, .05, and .09 widths. I have black and sepia sets from both brands, and from years of experience with them, I have concluded that they are equal in quality. For this reason, my observations apply to both Prismacolor and Micron. If both brands are available to you in your area, I suggest buying whichever is cheaper or whichever package has the most variety.

Technical pens can give crisp, dark lines on thin sketch or copier paper, heavier card stock, and smooth Bristol board. They are less likely to bleed or feather on a tight smooth surface. I love to use the tiny extra fine points for small works of art and tight details. They have delicate nibs, however, so using them on heavy textured paper is not ideal, and you want to take care not to flatten the tip by pressing too hard.

A lot of young artists use them for manga and comic art, especially for details and very straight lines. These two brands are safe to use with alcohol markers without worrying about your lines being smudged. You can trust them not to skip or feather when using a ruler. Any liner will have limitations with line expression, however. You are not going to get variations and tapered lines like those from a brush or felt tip pen, but they are fantastic for crosshatching and creating other textures with short directional strokes.

Kuretake Fude #55 Brush pen 

This double-sided handsome Japanese brush pen is nice to hold and draw with. One side is a flexible brush nib that offers a nice line variation and smooth, rich ink coverage. The ither side is a very fine felt tip for details and fine lines. The fine tip is more flexible than the technical pens I have reviewed, but not as flexible as the brush tip. Both sides are brilliant for drawing any type of hair or fur, especially eyelashes and eyebrows. You can create dynamic lines with tapered ends and varying weights. The brush side is great for inking in small or medium solid spaces without any streaks or brush marks. The Fude #55 is an ideal pen for your travel art kit as you can get a nice range of lines from a single pen.  

Image of Zig Kuretake illustration set for Inktober
Image credit: Amazon.com 
Last year I bought the Kuretake Zig illustration set for Inktober 2020, and it is still available this year. The set includes the Fude #55 brush pen, the Zig Cartoonist white brush pen, the Zig Cartoonist Mangaka 01 technical pen (a good substitute for the .005 extra fine Micron and Prismacolor pens) and a Zig Cartoonist Mangaka flexible fine felt tip marker. You can use the last two pens with alcohol-based markers without smudging, but the Fude 55 will smudge in contact with alcohol markers. It makes for some interesting effects, but any fine lines will be lost if you combine the two types of ink. The white brush pen contains a heavy white ink that you might use for highlights. 


Closep image of the Fude #55 brush pen on top of the Inktober sketchbook
The Fude #55 Brush pen from Kuretake Zig

Out of the first eight Inktober prompts, my favorite was day 3: “Vessel”. My concept was a vessel for a spirit, and what makes a great almost human-looking vessel for a disembodied spirit? A doll, of course! Who doesn’t love creepy dolls? Ok, I know a few people who aren’t very fond of them, but even they will agree that it is a suitable horror concept. I mean...Annabelle, right? I made a pencil and pen sketch for that day, and while the result was not my best work, I think it is a good start for another finished work on better paper. (I will be editing this post with WIP images once I can get my photos transferred. Having technical issues, cue the womp-womp)

How has your first week of Inktober gone so far? Are you sharing your creations on social media?

Thursday, September 30, 2021

Let's Get Ready for Inktober 2021!


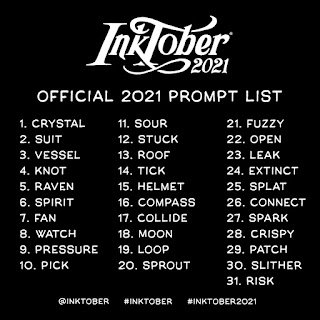
Aaaand, we’re back! Yeah, it’s been a while, and I am starting my InkTober 2021 series right at the very last minute, putting the “pro” in procrastinator. I assume you know what Inktober is, but if you haven’t seen the prompts for this year, go to Jay Parker’s site and have a look, refresh yourself on the rules. I am including the image of the prompt list below as well.

Image of Inktober 2021 prompts from official site
Inktober 2021 prompts (image credit: Jay Parker)


 I have a large list of products to review this month related to Inktober, so allow me to get this bit of housekeeping out of the way:

Affiliate Disclaimer: For full transparency, you should know that many of my links in my posts are affiliate links. As an Amazon affiliate, I receive a small commission when readers purchase items using my affiliate links. This helps me fund the blog domain costs, and you will not be charged extra if you buy anything using my links.

I bought many of these items last year and then did sweet F-all with them for the blog, so I am going to make up for it this year. I will be using my small hoard of ink, dip pens, nibs, technical pens, brush pens, and papers throughout the month of October and posting my #Inktober ideas with reviews of the items I used to make them. I should have been planning my ideas for the prompts already. I mean, I have decided this year to blog my raw process, and I hope this will be entertaining. Here is my list of various art supplies that I plan to use and review throughout October:

Amazon products:


JetPens Products:


Apologies for this hasty slap-dash post, but my goal is to review affordable art products for raggedy (hopefully not starving) artists. I think these reviews will be best broken up into regular blog posts that capture the spirit of Inktober. How do you plan to tackle this year's prompts? 

Tuesday, January 21, 2020

Brush Pen Markers: Are they really comparable to watercolors?


I have been trying out new art media each month for several months now, and this month was all about the brush pens that are cropping up everywhere. Many are marketed as “watercolor” pens, and they are, technically, watercolor in the sense of water-based dye or ink. I wanted to try a few to see how they compare to actual watercolor. Spoiler: there really is no comparison, but these pens are still worth trying.

Products I am reviewing: Tombow Dual Brush Pen Art Markers, Spreey Brush Pens, and GenCrafts Watercolor Brush Pens.

Affiliate Disclaimer: For full transparency, you should know that many of my links in my posts are affiliate links. As an Amazon affiliate, I receive a small commission when readers purchase items using my affiliate links. This helps me fund the blog domain costs, and you will not be charged extra if you buy anything using my links. 


Friday, January 17, 2020

Budget- Friendly Watercolor and Mixed Media Papers, Part II: Canson XL


I use a lot of Canson papers, but this entry will focus on the heavier watercolor and mixed media papers that allow wet media. I have acquired some new media since my last post, so I will be testing and discussing these new goodies, which include watercolor brush markers and alcohol markers from different brands. Reviews for these items will be the subjects of future posts.


Friday, November 22, 2019

Budget Friendly Mixed Media and Watercolor Papers: Part I

As you can see from previous posts, I have been experimenting with various water- based media including watercolor, gouache, water soluble pencils, and pens and markers lately. This means I have also been trying out several types of paper to see which ones are able to handle wet media without disintegrating. Before I get into the actual brands and types of papers, however, I would like to share a little bit of information about choosing an appropriate paper for your project. This post is going to be the first of two to keep the information more concise and easier to read.